 |
| |
MI6 looks back at the history of Bond 18 script
and the variety of sequences and characters that
differed from the final film... |
|
Tomorrow Never Dies Script History (3)
2nd January 2008
In
parts one and
two of this series, MI6 investigated the history
of the script for the 18th James Bond film, which would
be later dubbed "Tomorrow Never Dies".
 Tomorrow
Never Dies - Script History (Act 1) Tomorrow
Never Dies - Script History (Act 1)
Tomorrow
Never Dies - Script History (Act 2)
Ten years since the release of "Tomorrow
Never Dies", MI6 takes an in depth look at the initial
August 2006 draft by Bruce Feirstein with sequences, characters
and locations that never made it to the final shooting script.
With just a week to go before principal
photography was scheduled to start, Feirstein was recalled
and took back the reigns.
ACT III
Face to Face
Its revealed at this point the Sidney's interest is in the lost gold, but Bond cheekily explains "one third of nothing is still nothing" when she demands a share of the gold Bond recovered.
|
|
 |
Back on dry land, 007 is still intent to prove
Harmsway is behind the missing gold and is mildly taken aback
when he receives a telephone call and an invite from Elliott
to tour his new Kuala Lumpur building. In later drafts of the
script this sequence is split and reworked so that Bond receives
the
call the morning after the party in Hamburg, and the Kuala Lumpur
locations all become Ho Chi Minh (formerly Saigon) and Bond is
brought to the Carver headquarters by force.
 |
|
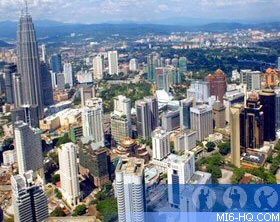
At the meeting, Harmsway
reminisces over his late wife (among other family members)
but there's another twist awaiting Bond - Sidney is also
invited to tea.
She protests that she knew there was
gold on board the ship and that someone must have got
there first. She begins to talk herself deeper into trouble.
To top it off, the villain reveals that he knows who
007 really is and shows him the KGB dossier on Bond,
which
has fallen into his hands.
Left: The striking cityscape of Kuala Lumpur...
|
In an elevator Bond tries to convince Sidney
that they are in danger, but she does not listen until the doors
of the lift open to reveal Stamper holding a gun. A
major battle ensues that climaxes with Bond and Sidney bailing
over
the side of the building (a similar plunge that Bond and Wai
Lin take in the reworked version of this scene).
Brummm...
Bond and the damsel in distress find themselves in the printing
works of the complex - a scene that was later reworked
as part of the Hamburg sequence - and is held with Bond
battling a goon until he falls into the gigantic presses.
Out of the print-house into the fire -
in the garage Harmsway
is waiting with a handful of thugs. To escape, Bond
initiates the remote control car and sends the goons scattering.
007 grabs Sidney and dives in the car. The chase is
back
on! The car exhibits a host of gadgets that
fans will remember from the Hamburg garage sequence, however
Feirstein's sequence does not conclude with the ease and
rapture of the final cut - in this early draft, Bond and
Sidney are captured and transported to Hong Kong.
|
|

Above: Bond's escape vehicle would ultimately become BMW's
7 series sedan.
|
Hong Kong Nuclear
Harmsway and Yung stage a break-in at a newly opened nuclear facility - under
the guise of an HNN news crew. With the control of the power plant, Harmsway
and Stamper use The Worm to sabotage the reactor intake tunnel. Once The Worm
reaches the reactor core, the uranium-tipped drill will bore its deadly teeth
in and cause a massive explosion, leaving Chernobyl looking like a campfire.
Elliott Harmsway grandly explains to 007 that
the nuclear meltdown is revenge against the city of Hong Kong
for driving him out - Harmsway tells Bond that he is returning
the land just as he found it, a "barren, lifeless rock!"
The plan in itself is not adjusted hugely for
the "Tomorrow Never Dies" shooting script. In both
plots the villain is manic with revenge against China - Carver
is mad that the Chinese government refused him broadcasting rights
and deals with it by launching a missile at Beijing. Harmsway's
plan has a much more catastrophic ring to it...
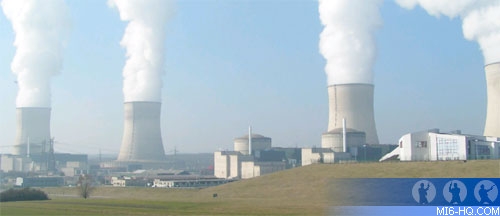
Above: A nuclear power plant may have
featured during the climax of "Tomorrow Never Dies" |
Bond, of course, is set to be left in the midst
of the meltdown and once again Harmsway has taken precautions
to assure that 007 will be blamed for the sabotage. Bond is locked
in the mid-point of the airlock and Harmsway and his cronies
depart with Sidney in tow. Yung and a guard remain in the control
centre to see the plan completed. While in the airlock, Bond
pulls Smithers' gizmos from concealment and rigs them together
to make
an explosive device. After blowing the door clean off and killing
the nearby guard, Bond engages in a tough battle with Yung climaxing
with the physicist being thrown through the window of the control
office and into the grinding path of the worm. It would seem
that this ceases the worm's mission to destroy the reactor. Although
this sequence is ultimately dropped from the final draft, the
battle and the manor of demise of Yung is recycled and used in
the death of Carver - getting masticated by his own sea-drill.
 |
|
Chopper
Bond requisitions the helicopter, which was to be Yung's escape route, and heads off in pursuit of Harmsway and Sidney. At first Harmsway's goons assume that it's Yung in the chopper, but soon it takes a massive dive and Bond pilots the chopper ready to attack.
Bond tilts the helicopter almost 90 degrees
forwards, using the rotor blades as a lethal weapon. Every "swish" of
the blades shatters glass, rips apart the Sea Dolphin and
sends several of the goons flying to the depths of the
South China Sea. This sequence is echoed in the final draft
when Bond is cornered by Carver's thugs in the markets
of Saigon.
The battle rages on and the remaining
thugs are passed M-16s by Stamper and begin to defend the
launch. Harmsway and Sidney are caught in the cabin by
the crossfire. One of the men is armed with a rocket launcher
and one well-placed rocket sends the chopper spiraling
out of control - straight towards the UK gold bullion.
Bond bails from the doomed helicopter, taking up the battle
by hand.
Left: While "Tomorrow
Never Dies" would only piece together the bare essentials
of the first draft, the 'chopper' sequence would
remain...
|
He fends of Stamper and heads to the bridge
to deal with Harmsway. Whilst the boat is falling apart around
them, villain and 007 have the final showdown. The water level
quickly
reaches the bridge and in the struggle, Bond gets the upper hand
and drowns Harmsway. With the death of the media mogul there's
only one task left for Bond - find Sidney! Luckily, when the
madness broke out on board she escaped the clutches of Harmsway,
donned Scuba gear and dived! Bond is reunited with her on the
floating life-boat of the Sea Dolphin and Q wires MI6 that Bond
is safe and sound.
The credits roll and proclaim, "James Bond Will Return".
The Last Word
When comparing this early draft to any of the finished Bond
films, it is clear that much of Feirstein's early work
required some
major
changes
before
shooting.
Although
the
final
script sees some of the characters and sequences dropped
from the film, these were on the whole necessary cuts to
tie up loose ends and keep the plot clearer and the action
straight-forward for its viewers. The initial draft spins
many plots and themes together but doesn't hold together
as one solid unit. At times, Feirstein's
work
is
loaded
with too many twists and not enough explanation to keep
to the successful formula of the Bond series.
When the script was ultimately reworked
by Spottiswoode and his team, the action was ramped and
the plot-lines smoothed out - unfortunately this meant
the loss of a variety of colourful characters such as Sidney
Winch, Valentin Zukovsky and Signore Digiacomo. "Tomorrow
Never Dies" stands
up as an action-packed, entertaining James Bond outing,
yet most viewers will be blissfully unaware of the number
writers and
drafts
that
the
18th Bond
outing
ploughed
through in less than a year of pre-production.
|
|
|
Related Articles
Tomorrow
Never Dies - Script History (Act 1)
Tomorrow
Never Dies - Script History (Act 2)
Tomorrow
Never Dies - Script History (Act 3)
Tomorrow Never Dies - Production Notes
 Tomorrow Never Dies - Movie Index


